lisa-marie mueller
let's build the next thing together
lisa-marie mueller
let's build the next thing together
resizing CropBoxes link
November 15, 2019
 This week we continue on the path to automating interior elevations. As a reminder, I have been building a plug-in that automates various parts of creating interior elevations, and I will continue to develop it. Since this project will evolve as I continue, I have determined to set my primary goal for each stage. With this goal in mind, I will develop a functioning piece of software to meet the goal. Then I will discuss topics that cover key aspects for each step for building the plug-in. At the end of each stage, I will move the plug-in to a public repository on GitHub so you can use it too.
if you missed it:
Part 1: filtered element collector [c#]
Part 2: finding centroids and considering exceptions
Part 3: ViewFamilyTypeId
Part 4: ViewPlanId and Levels
Part 5: phases & goal #1 complete [includes GitHub link to the release]
Part 6: view tempaltes
primary goal #2
Override the view’s parameters to set a view template, update the extents of the views, create a masking region, override the inside line weight of the masking region
CropBox
I have to admit I had a lot of fun with this one. I was able to recollect linear algebra which I have not used in many years. This week, we will create a method that adjusts the CropBox of the interior elevation views. You can use this for two things. First, to get rid of that pesky problem of having a small crop height on interior elevation views depending on your floors and levels (also discussed on the forums). Second, if you use masking regions over your interior elevation views to add a thick crop boundary and to make it easier to adjust the boundary around doors, other openings, and angled ceilings, we can set the crop of the interior elevation one foot beyond the room so the masking region shows.
coordinate systems
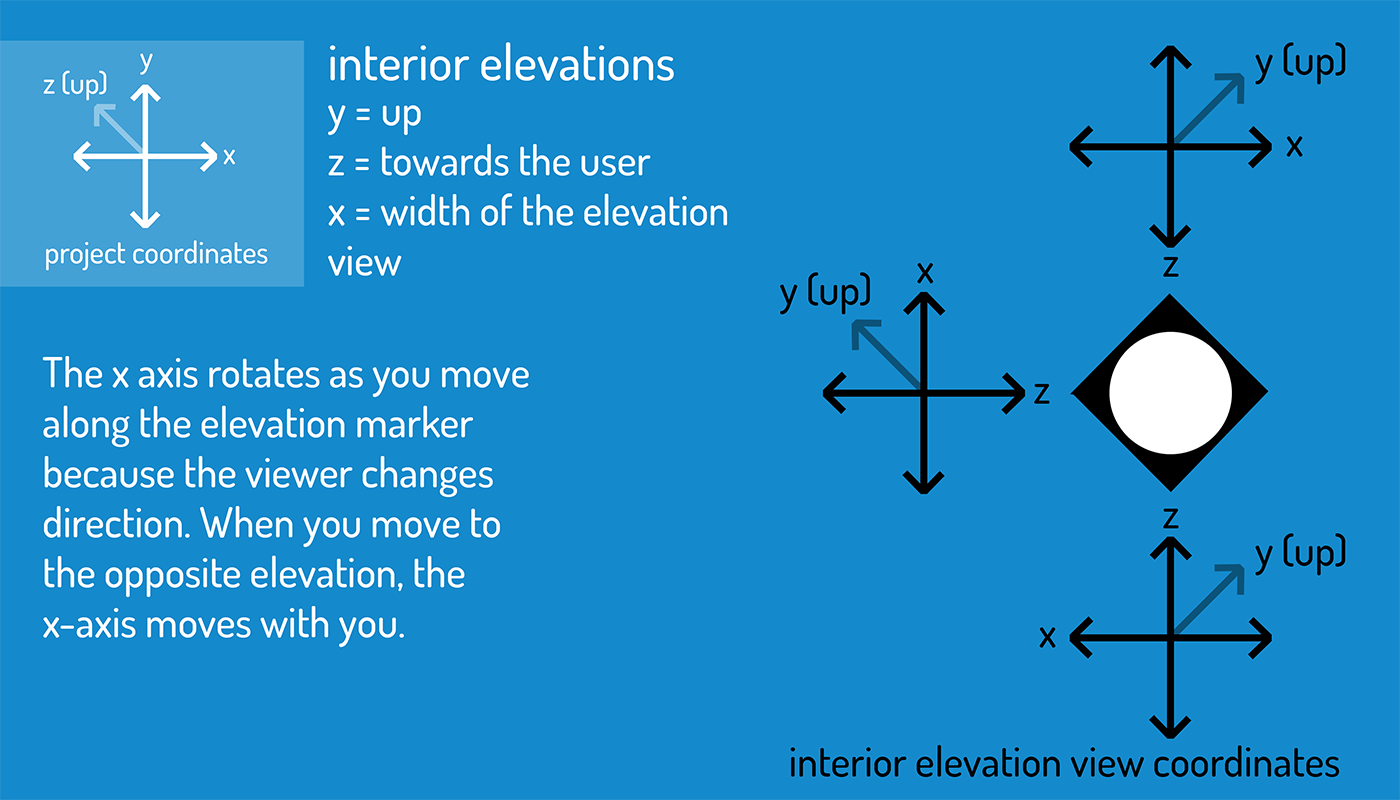
 While working on this part, I came across the fact that the coordinate system used for the view and the coordinate system used for the rooms is not the same. When you get the CropBox from a view, it uses the coordinate system of that view. However, when you overwrite the CropBox of the view, it uses the room’s (which is also usually the same as the project’s) coordinates. Additionally, in Revit the positive Z direction is always towards the user. So for example in plan view, Z is the direction that would be “up” in the real world, the height of your building. However, in elevations “up” is the Y coordinate. This means that the Y of the elevation maps to the Z of the room. But the X of the elevation varies and will be either the positive or negative X or the positive or negative Y of the room based on which elevation it is. This is because as you rotate around the elevation marker, Z stays towards the viewer, but the viewer is changing directions. This is why we need to use linear algebra. Thankfully, by using a linear transform, we can easily solve the problem.
transform
The other background information I wanted to touch on was that the Transform member in the Revit API was not working as expected for me. There is a Transform property for all BoundingBoxXYZs, in this case the CropBox of our view. When I attempted to use it to adjust the coordinates, it did not perform a linear transformation. So, I just set up my own matrices and calculated it out manually as you can see below.
We start by making our public method which will return a BoundingBoxXYZ (we will use this in Part 8, next week) and we will call it SetCropBox. It needs a ViewSection parameter which is our interior elevations views, and a Room parameter. We start by getting the bounds of the interior elevation CropBox and the bounds of the room’s CropBox. Then we set up our transform matrix with the basis coordinates. After we have that set up, we can do all the math and get out our transformed minimum and maximum values. Teaching everyone linear algebra would be a bit more than we have time for right now, so I recommend you check out some youtube videos if you do not remember transformations. Then we can create extended minimum and maximum bounds from our transformed coordinates. If you do not want to extend the bounds beyond the room boundary, simply keep the transformed coordinates.
box is empty
When I tried to assign the CropBox back to the interior elevation view, the assignment threw an InvalidArgumentException. The message was “Box is empty” in Revit. Looking into it, the exception happened when I was trying to set the larger coordinate value as the minimum and the smaller coordinate value as the maximum. To make sure this doesn’t happen, we added the following code to check if the minimum X and minimum Y values are the smaller values. If not, we switch the minimum and maximum.
Now we can just set our minimum and maximum values, set the bounds, and overwrite our elevation view’s CropBox. Next week, we’ll play around with filled regions.
code summary
resources
If you want to learn to code and don’t know where to start check out my posts about Steps to Learn to Code [for architects and designers] Part 1 and Part 2.